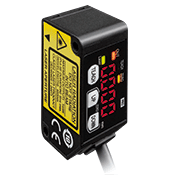
Reliable detection in repeatability 10 μm*
*HG-C1030(-P)
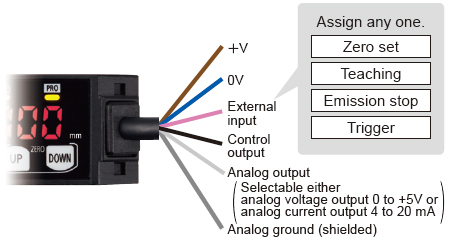
Analog output can be selected either "Analog voltage output" or "Analog current output".
Features
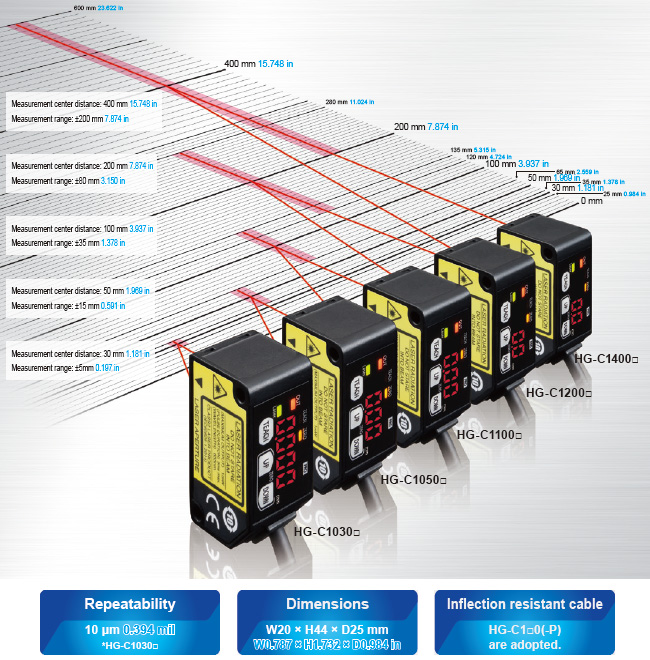
| Model No. | HG-C1030 | HG-C1050 | HG-C1100 | HG-C1200 | HG-C1400 |
|---|
| Measurement center distance |
30 mm
1.181 in |
50 mm
1.969 in |
100 mm
3.937 in |
200 mm
7.874 in |
400 mm
15.748 in |
|---|
| Measurement range |
±5 mm
0.197 in |
±15 mm
0.591 in |
±35 mm
1.378 in |
±80 mm
3.150 in |
±200 mm
7.874 in |
|---|
| Beam diameter |
ø50 μm
1.969 mil
approx. |
ø70 μm
2.756 mil
approx. |
ø120 μm
4.724 mil
approx. |
ø300 μm
11.811 mil
approx. |
ø500 μm
19.685 mil
approx. |
|---|
| Repeatability |
10 μm
0.394 mil |
30 μm
1.181 mil |
70 μm
2.756 mil |
200 μm
7.874 mil |
300 μm 11.811 mil
(Measuring distance 200 to 400mm
7.874 to 15.748 in)
800 μm 31.496 mil
(Measuring distance 400 to 600mm
15.748 to 23.622 in) |
|---|
Equipped with 0 to 5 V analog output and 4 to 20 mA analog current output
The value can be measured with a distance measurement sensor.
・ Linearity:±0.1%F.S.*
・ Temperature characteristics:0.03%F.S./℃
*HG-C1030(-P)/HG-C1050(-P)/HG-C1100(-P)
|
The sensor not only indicates measured values in mm but also produces analog voltage outputs.
Various calculations and storage (logging) can be performed when output is taken into a PLC + analog unit.
|
 |
|
Compact and light-weight
|
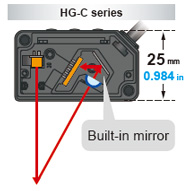
A new optical system with a built-in mirror
In general, more accurate and stable measurements can be obtained by increasing the optical path length between the light-receiving part and the light receiving element (CMOS), but this also increases the sensor depth and the sensor body gets bigger.
The HG-C series sensors incorporating a new optical system with a built-in mirror provides smaller sensor depth as well as higher measurement accuracy equivalent to displacement sensors.
|
|
|
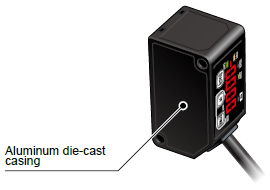
An aluminum die-cast casing protects from strain and heat
A light-weight but strong die-cast aluminum casing has been adopted. A compact, solid body casing reduces the impact of strain and heat on the measurement accuracy.
|
|
Overwhelmingly stable
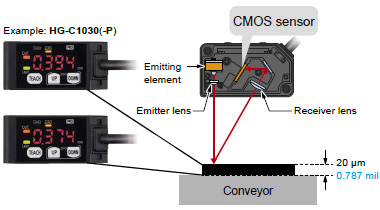
Precise measurements on the order of 1/100 mm 0.0003 inch*
*HG-C1030(-P)
|
Fitted with a precise CMOS image sensor and an original algorithm
Thanks to a precise CMOS image sensor, it is now possible to perform highly precise measurements in the order of 1/100 mm 0.0003 in. The existing adjustable range reflective sensors cannot achieve such accuracy.
|
 |
|
Useful functions
Teaching & window comparator mode
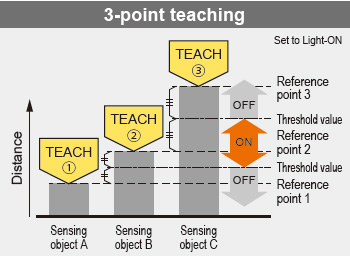
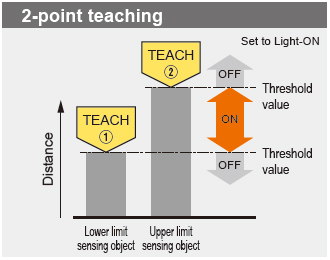
With an object below the sensor, press the TEACH key to set the valid range for distances via threshold values. There are 3 methods for setting the valid range: 1-point, 2-point, and 3-point teaching.
|
|
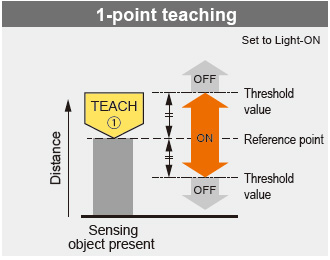
Perform 1-point teaching and the threshold range is set for the distance from the reference surface of the sensing object.
This is used for sensing within the threshold range.
|
|
|
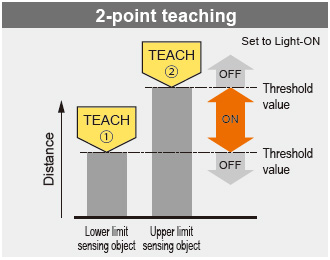
Press TEACH once for the lower (first point) and once for the upper limit (second point).
|
|
|
This is the method to set the threshold range by conducting the teaching at 3 points (sensing object A, B and C). After teaching, the reference points are automatically sorted in ascending order (reference point 1, 2 and 3). The thresholds are set at the midpoints between reference point 1 and 2, and 2 and 3, respectively.
|
|
|
In addition to the teaching & window comparator mode, the “rising differential mode”, “trailing differential mode” and “normal sensing mode” are available.
In normal sensing mode, “2-point teaching” as basic teaching and “limit teaching,” which is useful for very small objects and backgrounds, are possible.
|
Timer setting function
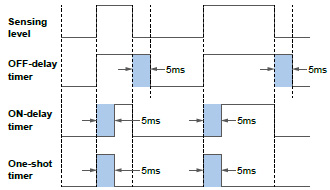
The time mode options are “off-delay timer,” “on-delay timer,” “one-shot timer” and “no timer.” The counting time is fixed to 5 ms.
|
|
Off-delay timer
Function : Extends output signals by 5 ms.
Usage : Appropriate in case a connected device is slow to respond and ON time is required to extend.
On-delay timer
Function: Overrides output signals for 5 ms after detection.
Usage: Convenient way to override temporary signals and control with a time lag.
One-shot timer
Function: Sends output signals for only 5 ms after detection.
Usage: Useful when the signal duration needs to be constant to meet inputs from a connected device.
This mode is also used to extend temporary signals by a desired length of time.
|
|
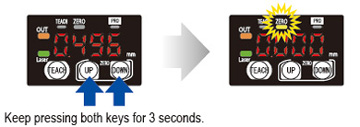
Zero set function
This function compulsorily sets the measured value to “zero.”
The zero point can be set at a desired value. It is useful when measuring steps or tolerance with reference to the height of a sensing object.
|
 |
* The zero set indicator (yellow) will turn ON while the zero set is valid.
* When the zero set function is executed while the peak hold function or the bottom hold function is valid, the held measurement value is reset.
* When the display setting is set to offset, the zero set function cannot be set. |
|
|
External input setting function
One of four functions, “zero setting function,” “teaching function,” “emission stopping function” and “trigger function” can be assigned to an external input line.
|
 |
|
|
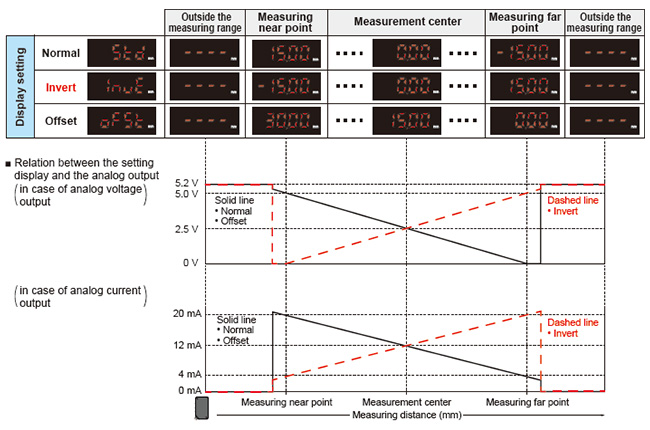
Display setting function
How to indicate measured values of the moving sensed object can be chosen from three options, “Normal,” “Invert” and “Offset.”
Example : HG-C1050
|
 |
|
Peak and bottom hold functions
The peak hold function holds the maximum measured value which is output and displayed.
The bottom hold function holds the minimum measured value which is output and displayed.
* The peak hold function and the bottom hold function cannot be set at the same time.
* When the zero set function is executed while the peak hold function or the bottom hold function is valid, the held measurement value is reset.
Threshold value fine adjustment function
Fine adjustment of threshold values can be performed while measurement is proceeding on the display, and even after teaching.
Key lock function
This function protects setting conditions from unintentional changes.
* For other functions and procedures for setting the functions, see“PRO Mode Setting”.
![]()
![]() CONTACTS: 0934.361.799
CONTACTS: 0934.361.799


